Rabu, 07 Februari 2018

Cara Install NET 3.5 Windows 10

NET framework merupakan salah komponen penting pada sistem operasi windows yang digunakan untuk menjalankan dan mendukung pengembangan berbagai macam aplikasi.
Pada windows 10 memang sudah terinstall NET framework yang lebih baru, yakni versi 4.5. Meskipun begitu, ada beberapa aplikasi yang masih membutuhkan NET framwork 3.5. Jadi ketika anda mencoba menjalankan aplikasi yang membutuhkan .NET framework 3.5, anda pasti mendapat jendela notifikasi yang kurang lebih seperti gambar dibawah ini. Dan ketika anda mencoba klik Download and install this feature, malah mendapat notif error.
Net framework 3.5 windows 10
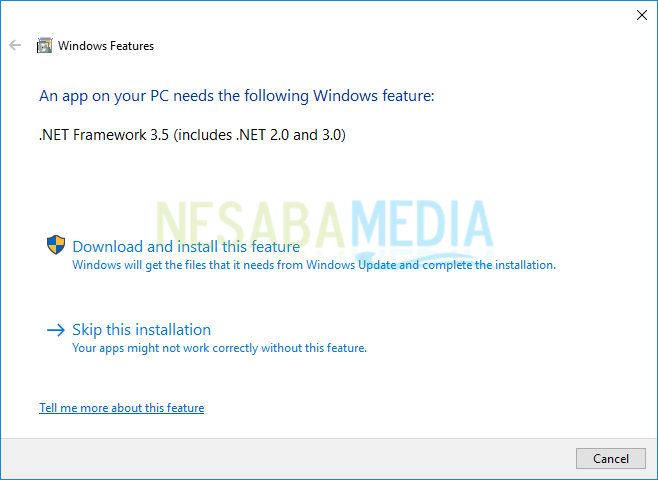
Notif Error NET Framework 3.5
NET Framework 3.5 ini sudah termasuk yang versi .NET 2.0 dan 3.0. Ketika anda sedang membuka/ menginstall aplikasi yang membutuhkan salah satu dari ketiga versi NET framework tersebut, anda cukup menginstal/ mengaktifkan yang versi 3.5 saja.

Cara Install NET Framework 3.5 di Windows 10

Untuk menginstall atau mengaktifkan NET framework 3.5 di windows 10 diperlukan file ISO-nya. Jadi terlebih dahulu anda harus memiliki file ISO windows 10, baik itu terdapat pada DVD installer, flashdisk atau pada laptop anda sendiri. Misalkan anda tidak mempunyai DVD installer windows 10, anda bisa mengguakan flashdisk yang dibootable atau yang paling gampang langsung menggunakan file ISO yang terdapat pada laptop/ PC anda (seperti pada tutorial ini). Simak langkah-langkah cara instal NET framework 3.5 dibawah ini:
1. Pertama masukkan media installer windows 10, baik berupa DVD installer atau bootable flashdisk. Jika anda ingin langsung menggunakan file ISO yang terdapat pada laptop/ PC anda, skip langkah pertama ini.
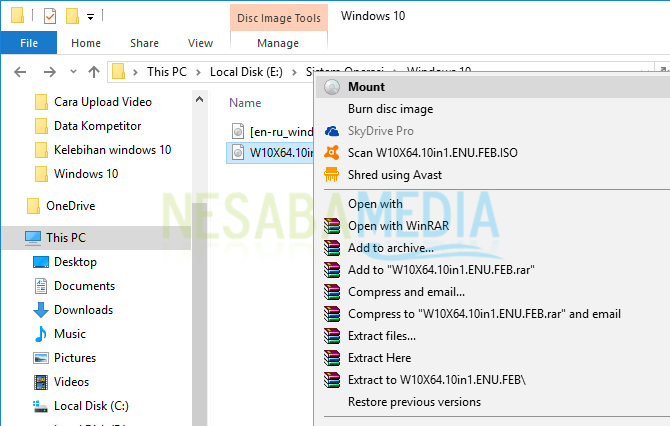
2. Mount file ISO windowsnya dengan cara klik kanan filenya, kemudian pilih Mount.
Pilih Mount windows 10
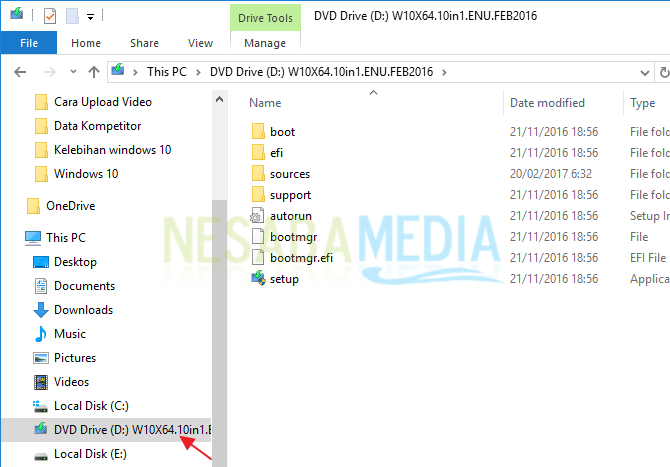
3. Pada contoh kali ini, lokasi file ISO windows 10 saya berada di drive D. Jadi ketika saya mount file ISO nya, nama drivenya akan berubah seperti yang telah saya beri tanda panah. Lokasi file ISO yang telah anda mount tadi tidak selalu berada di drive D, jadi tinggal menyesuaikan saja.
File ISO windows 10 yang sudah dimount
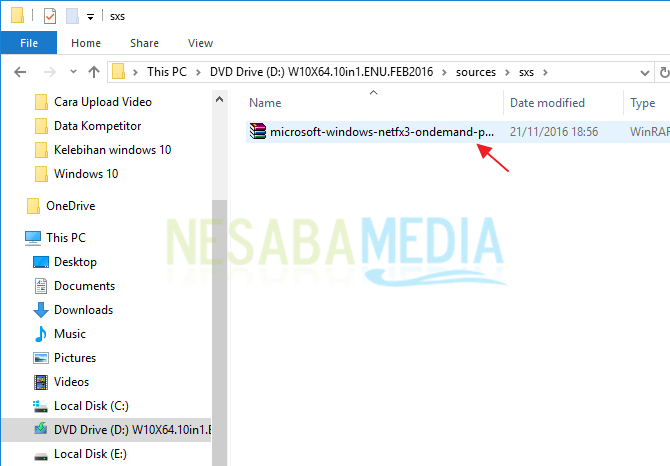
4. Sebagai catatan, lokasi file untuk mengaktifkan NET framwork 3.5 terletak pada folder sources > sxs. Jadi pastikan file yang bernama microsoft-windows-netfx3-ondemand-package harus ada pada folder tersebut.
net framework 3.5 win 10
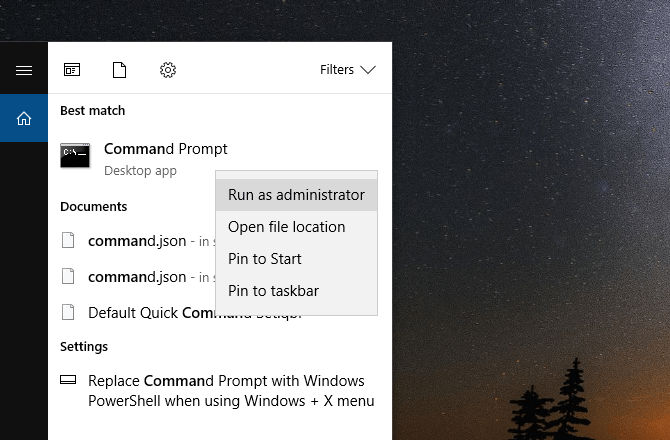
5. Setelah itu, buka Command Prompt sebagai admin dengan cara klik kanan Command Prompt kemudian pilih Run as administrator.
net framework 3.5 win 10
6. Copas perintah dibawah ini dengan terlebih dahulu mengganti X dengan lokasi drivenya. Misal lokasi file ISO yang telah saya mount tadi berada di drive D, maka ganti X dengan D. Kemudian tekan Enter.
Dism.exe /online /enable-feature /featurename:NetFX3 /All /Source:X:\sources\sxs /LimitAccess
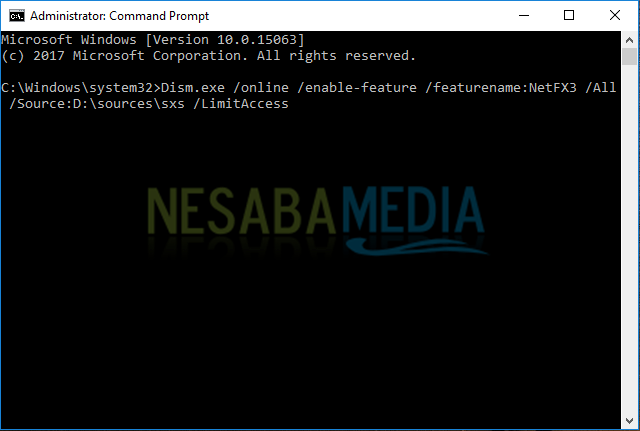
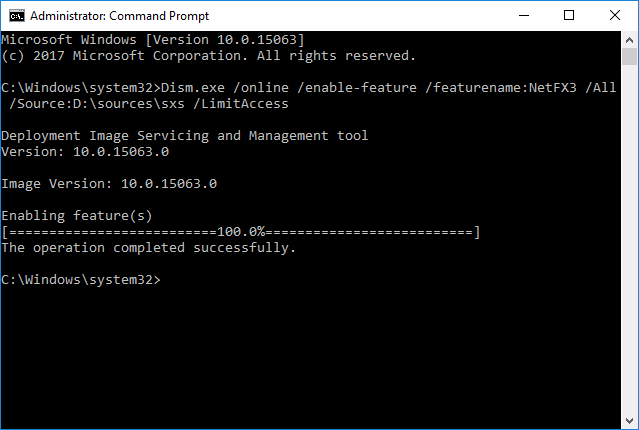
7. Tunggu prosesnya sekitar 3 menit sampai progress mencapai 100%.
8. Nah jika progress sudah mencapai 100% dan terdapat tulisan The operation completed succesfully, itu menandakan bahwa NET framework 3.5 sudah berhasil diinstall/ diaktifkan.
net framework 3.5 windows 10 offline

Bagaimana cara memastikan NET framework 3.5 sudah terinstall?

Untuk memastikan bahwa NET framework 3.5 sudah terinstall, anda bisa menyimak langkah-langkahnya dibawah ini:
1. Masuk ke Control Panel, kemudian pilih Programs.
2. Pada jendela Programs, pilih Turn Windows features on or off.
net framework 3.5 windows 10 offline
3. Pada jendela Windows Features, anda bisa melihat tanda checkbox berwarna hitam pada tulisan .NET Framework 3.5 (includes .NET 2.0 and 3.0) yang menandakan fitur .Net Framework sudah berhasil diaktifkan.
cara instal net framework 3.5 di windows 10
Itulah cara install NET framework 3.5 windows 10 secara offline. Jadi anda hanya perlu file ISO windows 10 untuk mengaktifkannya, tidak perlu harus mendownloadnya dari internet. Selamat mencoba dan jika anda menemukan masalah, bisa anda tanyakan melalui kotak komentar dibawah.

Selasa, 12 Desember 2017

Delphi 10.2 Tokyo - error: cannot find -lcurl

ubuntu :

sudo add-apt-repository ppa:ubuntu-sdk-team/ppa && sudo apt update && sudo apt dist-upgrade && sudo apt install ubuntu-sdk-ide

centos
sudo yum install -y gcc gcc-c++
sudo yum install -y openssl-devel


Senin, 11 Desember 2017

Delphi 10.2 Tokyo - crossvcl - error cannot find -IGL


  1. sudo apt install mesa-utils in Linux 
  2. sudo apt-get install freeglut3-dev build-essential libx11-dev libxmu-dev libxi-dev libgl1-mesa-glx libglu1-mesa libglu1-mesa-dev libglfw3-dev libgles2-mesa-dev
  3. update SDK in Delphi, ==> tools - Options - Enviroment Option - SDK Manager
  4. Finish

Sabtu, 28 Oktober 2017

Replace CR & LF with spaces - Oracle SQL

select replace(replace(alamat_pemilik,chr(10),''),chr(13),' ') alamat from dual

Rabu, 18 Oktober 2017

Join SQL

Tuk pengingat aku dan yang lain jk ada yg butuh


Jumat, 06 Mei 2016

TOAD ORA-01031: insufficient privileges when connecting to Oracle 12c

An issue  faced is that when we try to connect from TOAD (version: 11.6 ) to a newly upgraded Oracle database 12c we faced the error:
ORA-01031: insufficient privileges
TOAD Error Message ORA-01031
The reason we are facing this problem, is the newly security implementation by Oracle in 12c for the system privilege SELECT ANY DICTIONARY. They have stripped this system privilege from accessing the following tables:USER$, ENC$,DEFAULT_PWD$, LINK$, USER_HISTORY$, CDB_LOCAL_ADMINAUTH$, XS$VERIFIERS
The current TOAD version checks the old (SELECT ANY DICTIONARY) which already has this table SYS.USER$ part of its permissionwhen it can’t access this table, it throws the error message:  ORA-01031
The reason in 12c they stripped those tables from “SELECT ANY DICTIONARY” is to protect the passwords in case this privilege is granted to non-DBA account , so the hashed passwords are not exposed (ONLY SYS account can query those tables).
So, to let the current version of TOAD works for 12c execute the following sql query:
SQL> grant select on sys.user$ to database_account;
Hope This Helps😉

Senin, 29 Februari 2016

Shortcuts Keyboard Sublime 3

Shortcuts Keyboard Sublime 3

Basic

F11Full Screen
shift + F11Distraction Free Mode
ctrl + shift + pCommand Palette
ctrl + `Show Console
ctrl + k + bShow/Hide Sidebar
ctrl + /Comment
ctrl + shift + /Block Comment
ctrl + k + uUppercase
ctrl + k + lLowercase

Selections

ctrl + dSelect Word
ctrl + dUse multiple times to select next instance of the selected word
ctrl + clickCreate multiple cursors for multi-editing
ctrl + shift + spaceExpand selection to scope. Repeating keeps expanding.
ctrl + shift + mExpand to brackets
ctrl + shift + jExpand to indentation

Go To

ctrl + pOpen file based on name
ctrl + gGo to line number
ctrl + rGo to symbol
ctrl + p THEN @Open file based on name and search for symbol
ctrl + mGo to matching bracket

Lines

ctrl + lSelect line
ctrl + shift + kDelete line
ctrl + ]Indent
ctrl + [Unindent
ctrl + enterInsert line after
ctrl + shift + enterInsert line before
ctrl + shift + ↑Swap line up
ctrl + shift + ↓Swap line down
ctrl + shift + dDuplicate line
ctrl + jJoin Line

Code Folding

ctrl + shift + [Fold
ctrl + shift + ]Unfold
ctrl + k + jUnfold All

Search / Find / Replace

ctrl + fFind
F3Find next
shift + F3Find previous
ctrl + shift + fSearch all files in a folder
ctrl + hReplace
ctrl + f THEN alt + enterFind a certain term then select them all for multi-editing

Tabs and Window Panes

ctrl + shift + nNew Window
ctrl + nNew Tab
alt + #Select a Tab (ie alt + 3)
ctrl + wClose Tab
ctrl + shift + #Move tab to a Pane (ie ctrl + shift + 2)
ctrl + #Focus on a Pane (ie ctrl + 2)
alt + shift + 1One Column
alt + shift + 2Two Columns
alt + shift + 3Three Columns
alt + shift + 4Four Columns
alt + shift + 8Two Rows
alt + shift + 9Three Rows
alt + shift + 5Two x Two Grid

Bookmarks

ctrl + F2Create Bookmark
F2Next Bookmark
shift + F2Previous Bookmark
ctrl + shift + F2Clear Bookmarks