Rabu, 26 Desember 2018

RHEL 6 Update GLIBC 2.12 to GLIBC 2.17

This often occurs when you build software in RHEL 7 and try to run on RHEL 6.
To update GLIBC to any version, simply download the package from
For example glibc-2.14.tar.gz in your case.
  1. tar xvfz glibc-2.14.tar.gz
  2. cd glibc-2.14
  3. mkdir build
  4. cd build
  5. ../configure --prefix=/opt/glibc-2.14
  6. make
  7. su
  8. make install
  9. export LD_LIBRARY_PATH=/opt/glibc-2.14/lib:$LD_LIBRARY_PATH
Then try to run your software, glibc-2.14 should be linked.

Kamis, 11 Oktober 2018

SQLite

Encrypt a database

The following example shows how to encrypt an existing database:

UniConnection.Database := 'C:\sqlite.db3';                                   // the name of the database to be encrypted
UniConnection.SpecificOptions.Values['ForceCreateDatabase'] := 'False';      // to check that the database exists
UniConnection.SpecificOptions.Values['Direct'] := 'True';                    // database file encryption is supported in the Direct mode only
UniConnection.SpecificOptions.Values['EncryptionAlgorithm'] := 'leBlowfish'; // the database will be encrypted with the Blowfish encryption algorithm
UniConnection.SpecificOptions.Values['EncryptionKey'] := '';                 // no encryption key specified, because the database is not encrypted yet
UniConnection.Open;                                                          // connect to the database
TLiteUtils.EncryptDatabase(UniConnection, '11111');                          // encrypt the database using the "11111" encryption key

Creating of a new encrypted database

The following example shows creating a new encrypted database:

UniConnection.Database : = 'C:\sqlite_encoded.db3';                          // the name of the database to be created
UniConnection.SpecificOptions.Values['ForceCreateDatabase'] := 'True';       // this will allow to create the new database
UniConnection.SpecificOptions.Values['Direct'] := 'True';                    // database file encryption is supported in the Direct mode only
UniConnection.SpecificOptions.Values['EncryptionAlgorithm'] := 'leBlowfish'; // the database will be encrypted with the Blowfish encryption algorithm
UniConnection.SpecificOptions.Values['EncryptionKey'] := '11111';            // the encryption key for the database
UniConnection.Open;                                                          // create and connect to the database

Connecting to an encrypted database

To connect to an existing encrypted database, the following should be performed:

UniConnection.Database := 'C:\sqlite_encoded.db3';                           // the name of the database to connect to
UniConnection.SpecificOptions.Values['ForceCreateDatabase'] := 'False';      // to check that the database exists
UniConnection.SpecificOptions.Values['Direct'] := 'True';                    // database file encryption is supported in the Direct mode only
UniConnection.SpecificOptions.Values['EncryptionAlgorithm'] := 'leBlowfish'; // the encryption algorithm of the database
UniConnection.SpecificOptions.Values['EncryptionKey'] := '11111';            // the encryption key for the database
UniConnection.Open;                                                          // connect to the database

Changing the encryption key for the database

To change the encryption key in the encrypted database, you must perform the following:

UniConnection.Database := 'C:\sqlite_encoded.db3';                           // the name of the database to connect to
UniConnection.SpecificOptions.Values['ForceCreateDatabase'] := 'False';      // to check that the database exists
UniConnection.SpecificOptions.Values['Direct'] := 'True';                    // database file encryption is supported in the Direct mode only
UniConnection.SpecificOptions.Values['EncryptionAlgorithm'] := 'leBlowfish'; // the encryption algorithm of the database
UniConnection.SpecificOptions.Values['EncryptionKey'] := '11111';            // the encryption key for the database
UniConnection.Open;                                                          // connect to the database
TLiteUtils.EncryptDatabase(UniConnection, '22222');                          // change the database encryption key to '22222'
After changing the encryption key, the database connection remains open and the further work with the database can continue. However, if disconnected from the database and for subsequent connection, the new value of the encryption key should be assigned to the UniConnection.EncryptionKey property.

Sabtu, 23 Juni 2018

oracle procedure v$session not detect

connect to sys as sysdba;
GRANT SELECT ON gv_$session TO system;

Rabu, 13 Juni 2018

Cek Oracle Runing in Operating Sistem

SELECT PRODUCT, VERSION FROM SYS.PRODUCT_COMPONENT_VERSION; 
or

select dbms_utility.port_string from dual;

Minggu, 01 April 2018

Delphi Popup Menu

procedure bCetakDetailClick(Sender: TObject);
var
   p : TPoint;
begin
   with Sender as TButton do
   begin
      if PopupMenu2 = nil then
         beep
      else
         begin
            GetCursorPos( p );
            p.x := Left + 1;
            p.y := Top + Height + 1;
            p := Self.ClientToScreen( p );
            PopupMenu2.popup( p.x, p.y );
         end;
   end;
end;

Selasa, 13 Februari 2018

Algorithm negotiation failed for SSH Secure Shell Client

If you are using the dated SSH Secure Shell Client 3.2.9, you may have issue connect to the more updated OpenSSH Server.
SSH
If you cannot change the client (which is recommended), you will have to update the OpenSSH Server on Linux. Add this in
# vim /etc/ssh/sshd_config
# Ciphers
Ciphers aes128-cbc,aes192-cbc,aes256-cbc,blowfish-cbc,arcfour
KexAlgorithms diffie-hellman-group1-sha1
*If you are using Centrify-OpenSSH, you have to modify /etc/centrifydc/ssh/sshd_config and do the same

can't ssh into remote host with root, password incorrect - ubuntu

# vim /etc/ssh/sshd_config
PermitRootLogin without-password
change to
PermitRootLogin yes
Restart your ssh service.
restart ssh server.

Rabu, 07 Februari 2018

Cara Install NET 3.5 Windows 10

NET framework merupakan salah komponen penting pada sistem operasi windows yang digunakan untuk menjalankan dan mendukung pengembangan berbagai macam aplikasi.
Pada windows 10 memang sudah terinstall NET framework yang lebih baru, yakni versi 4.5. Meskipun begitu, ada beberapa aplikasi yang masih membutuhkan NET framwork 3.5. Jadi ketika anda mencoba menjalankan aplikasi yang membutuhkan .NET framework 3.5, anda pasti mendapat jendela notifikasi yang kurang lebih seperti gambar dibawah ini. Dan ketika anda mencoba klik Download and install this feature, malah mendapat notif error.
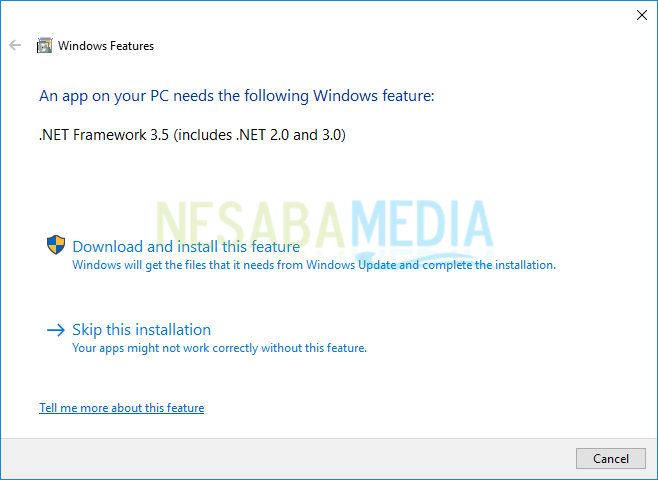
Net framework 3.5 windows 10
Notif Error NET Framework 3.5
NET Framework 3.5 ini sudah termasuk yang versi .NET 2.0 dan 3.0. Ketika anda sedang membuka/ menginstall aplikasi yang membutuhkan salah satu dari ketiga versi NET framework tersebut, anda cukup menginstal/ mengaktifkan yang versi 3.5 saja.

Cara Install NET Framework 3.5 di Windows 10

Untuk menginstall atau mengaktifkan NET framework 3.5 di windows 10 diperlukan file ISO-nya. Jadi terlebih dahulu anda harus memiliki file ISO windows 10, baik itu terdapat pada DVD installer, flashdisk atau pada laptop anda sendiri. Misalkan anda tidak mempunyai DVD installer windows 10, anda bisa mengguakan flashdisk yang dibootable atau yang paling gampang langsung menggunakan file ISO yang terdapat pada laptop/ PC anda (seperti pada tutorial ini). Simak langkah-langkah cara instal NET framework 3.5 dibawah ini:
1. Pertama masukkan media installer windows 10, baik berupa DVD installer atau bootable flashdisk. Jika anda ingin langsung menggunakan file ISO yang terdapat pada laptop/ PC anda, skip langkah pertama ini.
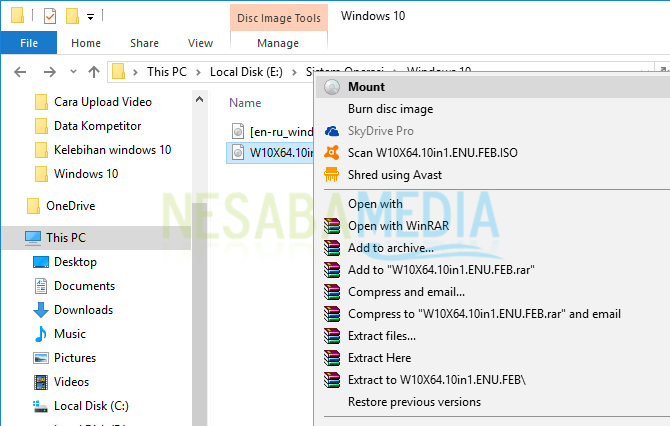
2. Mount file ISO windowsnya dengan cara klik kanan filenya, kemudian pilih Mount.
Pilih Mount windows 10
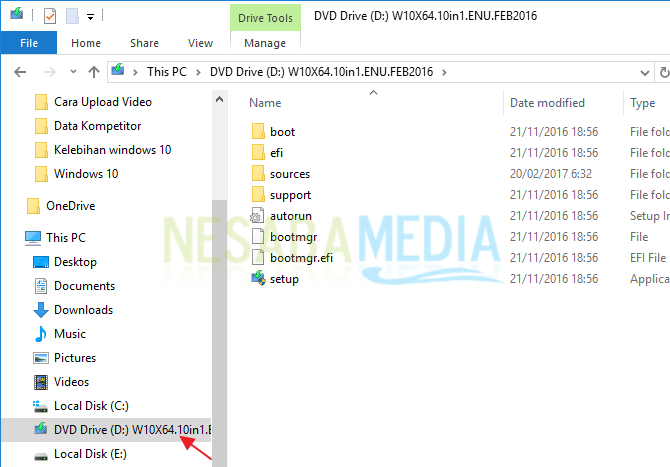
3. Pada contoh kali ini, lokasi file ISO windows 10 saya berada di drive D. Jadi ketika saya mount file ISO nya, nama drivenya akan berubah seperti yang telah saya beri tanda panah. Lokasi file ISO yang telah anda mount tadi tidak selalu berada di drive D, jadi tinggal menyesuaikan saja.
File ISO windows 10 yang sudah dimount
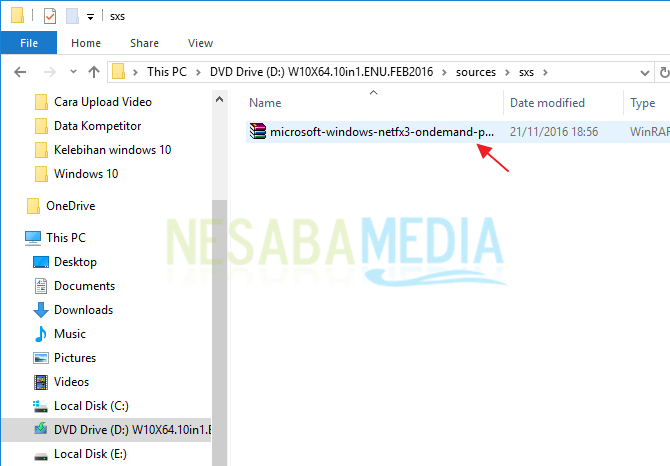
4. Sebagai catatan, lokasi file untuk mengaktifkan NET framwork 3.5 terletak pada folder sources > sxs. Jadi pastikan file yang bernama microsoft-windows-netfx3-ondemand-package harus ada pada folder tersebut.
net framework 3.5 win 10
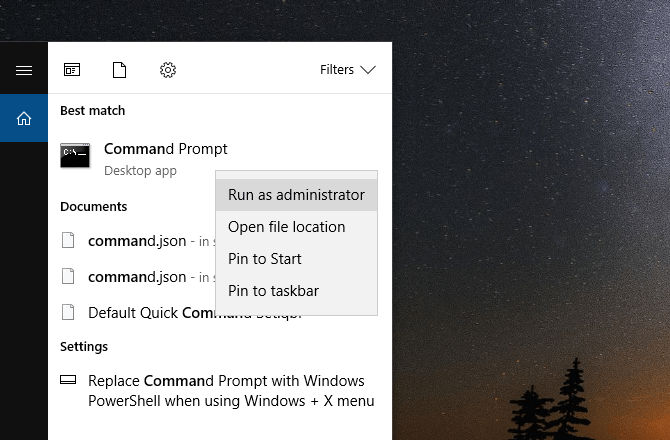
5. Setelah itu, buka Command Prompt sebagai admin dengan cara klik kanan Command Prompt kemudian pilih Run as administrator.
net framework 3.5 win 10
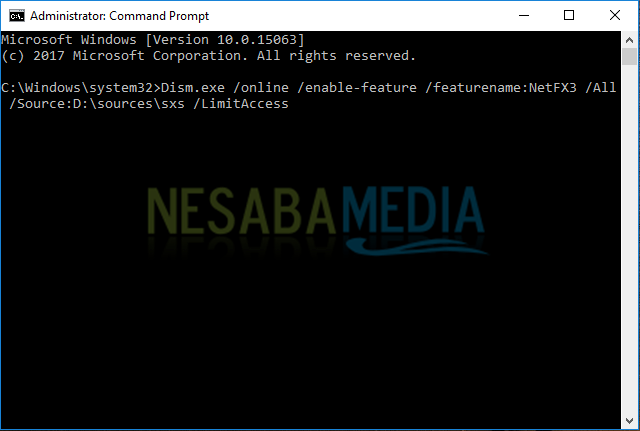
6. Copas perintah dibawah ini dengan terlebih dahulu mengganti X dengan lokasi drivenya. Misal lokasi file ISO yang telah saya mount tadi berada di drive D, maka ganti X dengan D. Kemudian tekan Enter.
Dism.exe /online /enable-feature /featurename:NetFX3 /All /Source:X:\sources\sxs /LimitAccess
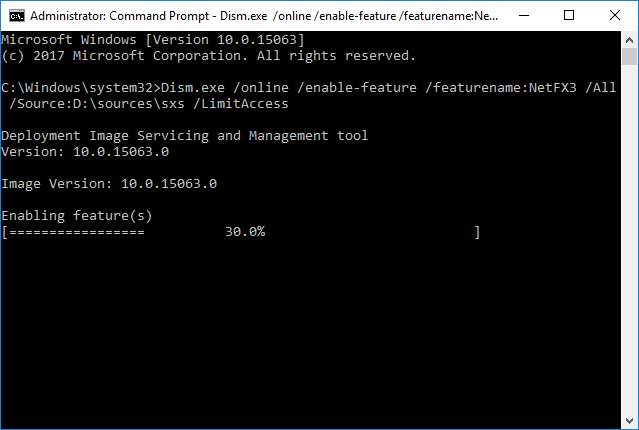
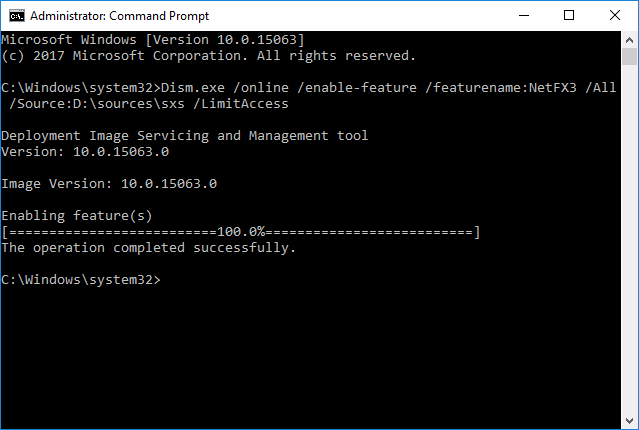
7. Tunggu prosesnya sekitar 3 menit sampai progress mencapai 100%.
8. Nah jika progress sudah mencapai 100% dan terdapat tulisan The operation completed succesfully, itu menandakan bahwa NET framework 3.5 sudah berhasil diinstall/ diaktifkan.
net framework 3.5 windows 10 offline

Bagaimana cara memastikan NET framework 3.5 sudah terinstall?

Untuk memastikan bahwa NET framework 3.5 sudah terinstall, anda bisa menyimak langkah-langkahnya dibawah ini:
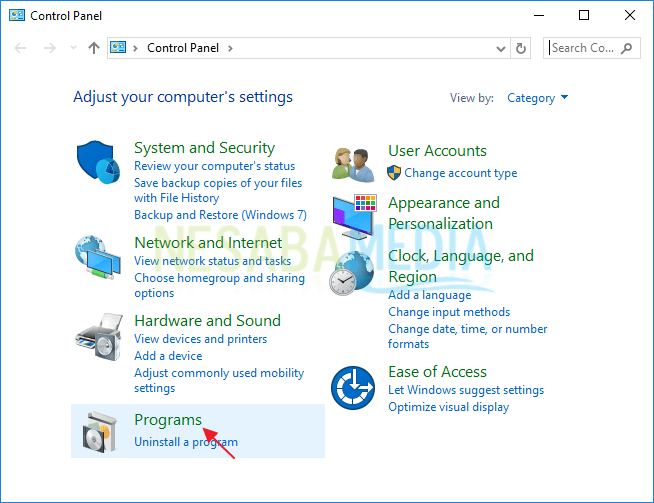
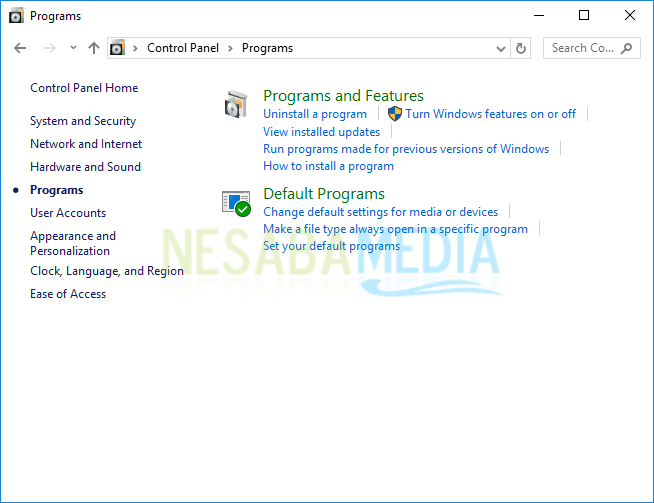
1. Masuk ke Control Panel, kemudian pilih Programs.
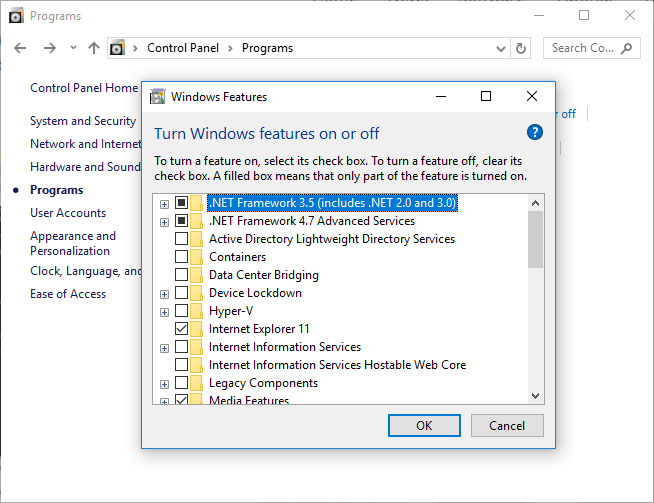
2. Pada jendela Programs, pilih Turn Windows features on or off.
net framework 3.5 windows 10 offline
3. Pada jendela Windows Features, anda bisa melihat tanda checkbox berwarna hitam pada tulisan .NET Framework 3.5 (includes .NET 2.0 and 3.0) yang menandakan fitur .Net Framework sudah berhasil diaktifkan.
cara instal net framework 3.5 di windows 10
Itulah cara install NET framework 3.5 windows 10 secara offline. Jadi anda hanya perlu file ISO windows 10 untuk mengaktifkannya, tidak perlu harus mendownloadnya dari internet. Selamat mencoba dan jika anda menemukan masalah, bisa anda tanyakan melalui kotak komentar dibawah.